Thursday, January 29, 2009

Daring Bakers going light in January: Tulies


After the very time consuming French Yule log for the December challenge, I was very pleased to find out that this months challenge was less time consuming and above all not too bad for my figure! This month's challenge is brought to us by Karen of Bake My Day and Zorra of 1x umruehren bitte aka Kochtopf. They have chosen Tuiles from The Chocolate Book by Angélique Schmeink and Nougatine and Chocolate Tuiles from Michel Roux. I was really excited when we could choose the shape we wanted to make our tulies and since butterflies are one of my favorite things I couldn't wait to attempt my butterfly tulies! So after making the batter I used some wax paper to make a butterfly stencile. After that I used a spatula to put the batter over the stencile leaving the butterfly shape. Then with the remaining batter I used cocoa powder to make it brown and add designs. I even did one in honor of the Daring Bakers!

Now baking time! Right after they came out of the oven very quickly you were supposed to mold them. I found this decoration in my house I got for my wedding and thought if I tilted it on it's side it would work perfect to give the tulies their buttefly shape, and it did!

I decided to pair my tulies with a white chocolate mouse, but a very
simple white chocolate mouse consisting only of white chocolate
instant pudding and cool whip. I know I opted for the
lazy choice on this one, but it was still good!
If any of you want to take a whack at these darling little almond cookies here is the recipe. They were very simple and anyone could make them. And don't forget to check out how the other Daring Bakers did!

Recipe:
Yields: 20 small butterflies/6 large (butterflies are just an example)
Preparation time batter 10 minutes, waiting time 30 minutes, baking time: 5-10 minutes per batch

65 grams / ¼ cup / 2.3 ounces softened butter (not melted but soft)
60 grams / ½ cup / 2.1 ounces sifted confectioner’s sugar
1 sachet vanilla sugar (7 grams or substitute with a dash of vanilla extract)
2 large egg whites (slightly whisked with a fork)
65 grams / 1/2 cup / 2.3 ounces sifted all purpose flour
1 table spoon cocoa powder/or food coloring of choice
Butter/spray to grease baking sheet

Oven: 180C / 350F

Using a hand whisk or a stand mixer fitted with the paddle (low speed) and cream butter, sugar and vanilla to a paste. Keep stirring while you gradually add the egg whites. Continue to add the flour in small batches and stir to achieve a homogeneous and smooth batter/paste. Be careful to not overmix.
Cover the bowl with plastic wrap and chill in the fridge for at least 30 minutes to firm up. (This batter will keep in the fridge for up to a week, take it out 30 minutes before you plan to use it).

Line a baking sheet with parchment paper or grease with either butter/spray and chill in the fridge for at least 15 minutes. This will help spread the batter more easily if using a stencil/cardboard template such as the butterfly. Press the stencil on the bakingsheet and use an off sided spatula to spread batter. Leave some room in between your shapes. Mix a small part of the batter with the cocoa and a few drops of warm water until evenly colored. Use this colored batter in a paper piping bag and proceed to pipe decorations on the wings and body of the butterfly.

Bake butterflies in a preheated oven (180C/350F) for about 5-10 minutes or until the edges turn golden brown. Immediately release from bakingsheet and proceed to shape/bend the cookies in the desired shape. These cookies have to be shaped when still warm, you might want to bake a small amount at a time or maybe put them in the oven to warm them up again. (Haven’t tried that). Or: place a bakingsheet toward the front of the warm oven, leaving the door half open. The warmth will keep the cookies malleable.

If you don’t want to do stencil shapes, you might want to transfer the batter into a piping bag fitted with a small plain tip. Pipe the desired shapes and bake. Shape immediately after baking using for instance a rolling pin, a broom handle, cups, cones….

Take a bite out of this cake!


Some of the frosting started bulging out of one side,
but everyone cake has a back and this was it!


A week ago it was my sister in laws birthday, naturally I jumped to volunteer to make the cake. This was going to be a fun one! My sister in law loves sharks so I thought a shark cake would be unique. I was looking for a yummy yellow cake recipe to use. I have an almond cake recipe which I love, but wanted to try something different. I decided to try bakerella's recommend moist yellow cake recipe. From her pictures it looked fab! So I went ahead and made it. Now, I usually don't have trouble with cakes turning out, it's one of those things that I have practiced a lot and have kind of mastered it...I thought! This was my first cake in which I used self rising flour, with no added baking soda or powder. I made the batter (which tasted amazing!) and couldn't wait to get it in the oven. When the timer went off and I peaked in the oven I almost cried!! The middles of my cake were completely sunken in, and when I flipped them out of the pan the other side was sunken in as well. This happened to all three layers. Here is my conclusion: I think because I live in Utah with such a high altitude I needed to add some extra baking powder or flour. Next time I try this cake I will definitely make an adjustment. As for the taste, amazing! This was such a delicious cake, and when I stacked it and put lots and lots of frosting to make it even it looked just fine. I added a little almond extract to this cake-I just couldn't hold back! But next time I will refrain from my almond addiction and let the true flavors of this cake shine because it was moist and delicious and I'm sure it would be amazing without the almond. For the frosting, I used my favorite buttercream recipe


Moist Yellow Cake

1 cup (2 sticks) of butter (room temperature)
2 cups of sugar
4 eggs (room temperature)
3 cups of sifted self-rising flour (White Lily)
1 cup of whole milk (room temperature)
1 teaspoon pure vanilla extract (McCormicks)
1/2 teaspoon butter flavoring
  • Preheat oven to 350 degrees.
  • Grease and flour (3) 8 inch cake pans.
  • Using a mixer, cream butter until fluffy.
  • Add sugar and continue to cream for about 7 minutes.
  • Add eggs one at a time. Beat well after each egg is added.
  • Add flour and milk (alternating to creamed mixture), beginning and ending with flour.
  • Add vanilla and butter flavoring to mix; until just mixed.
  • Divide batter equally into three cake pans.
  • Hold each layer about 3 inches above your counter and carefully drop the pans flat onto counter several times to ensure release of any air bubbles. This will help you have a more level cake.
  • Bake for 25 - 30 minutes (depending on your oven) until done.
  • Cool in pans for 5 - 10 minutes.
  • Remove and immediately wrap each layer in plastic wrap to seal in moisture. Cool completely on wire racks.
  • Once cooled, you are ready to assemble your cake.
Here's a little trick to add moisture into your layers:
  • Combine 1 cup of sugar and 2 cups of water.
  • Bring to boil and boil for approximately 3 minutes. Let cool.
  • Pour liquid into a spray bottle or pouring bottle.

Monday, January 26, 2009

Easy as 1, 2, 3....


A little while ago I was flipping through my sisters in laws gluten free cook book. I came a crossed a peanut butter cookie recipe that was so easy consisting only of 3 ingredients: peanut butter, sugar, and an egg. I just had to try it! It was so nice making something without a lot of clean up, but they just seemed too good to be true. I thought there was no way something so easy could be good. But I was very very wrong! They were very yummy, in fact, they tasted just like any other peanut butter cookie I had ever had. If I tried them at a party there was no way I would think that they only had 3 ingredients. I don't think I will ever use a different peanut butter cookie recipe again because they were so easy, delicious, and moist. Now, if anyone has a peanut butter cookie recipe that is just to die for I would love to hear it! But until I find one that is worth all the effort, I will stick to these easy as 1, 2,3 peanut butter cookies.
And, for an added plus for our Celiac friends, they are gluten free!

Easy Peanut Butter Cookies
1 cup sugar
1 egg
1 cup crunchy peanut butter or smooth
Preheat oven to 400°F.

Combine ingredients and mix well. Roll into 1 inch balls. Place on ungreased an cookie pan. Press with back of a fork. Press again in the opposite direction to make criss-cross marks.

Bake for 8 to 10 minutes at 400°F. That's it!


Sunday, January 18, 2009

Jumping on the healthy bandwagon!


I know I have been lacking in my posts lately due to the healthy kick I am on. I am hoping this time it wont be just a "kick" but that I will improve my eating habits for good. However, that is not easy for an avid baker and it definitely doesn't make my blog very exciting when most the things I feature and make are yummy delights! So I decided I needed a healthy alternative to the usual fattening and o so good desserts I make. Luckily for me many bloggers have already beaten me to the punch and have found healthy yummy recipes so I wont have to. Thanks to cookie madness I stumbled acrossed this agave oatmeal cookie recipe. I purchased agave nectar at the grocery store the other day and have not known what to make with it until now! This recipe is definitely a winner in my opinion, it is satisfying for someone watching their sweet tooth and I think also would be a very good snack to have during the day. With no sugar, no preservatives, and no white processed flour how could it be that bad? However, I did toss in a few chocolate chips-hey I'm baby steppin! I also ommited the raisins. Hope you can try these out. I doulbed the recipe and they turned out just fine. I think coconut would also be a wonderful addition to them next time. Enjoy!


Agave & Honey Oatmeal Cookies

2 tablespoons lightly beaten egg (approx)
3 tablespoons agave nectar
1 tablespoon honey
2 tablespoons vegetable oil
1 teaspoon vanilla
1/2 cup whole wheat pastry flour (2 oz)
1 tablespoon toasted wheat germ
1/8 teaspoon EACH baking soda & baking powder
1/4 scant teaspoon salt
1/4 teaspoon cinnamon
3/4 cups old fashioned oats
1/3 cup raisins

Preheat the oven to 375 degrees F.

Mix egg, agave, honey, oil and vanilla together in a bowl. Stir very well.
Combine flour, wheat germ, baking powder, baking soda, salt and cinnamon in a bowl. Stir very well, then add to agave mixture and stir until blended. Stir in the oats and raisins. Let batter sit for about 5 minutes.

Using a tablespoon measure, scoop up dough and arrange on parchment lined cookie sheets spacing 2 inches apart. Bake one sheet at a time for about 10-11 minutes. Let cool completely.

Makes 8 cookies

Monday, January 12, 2009

It's a girl cupcakes!


My sister in Law Kori had a baby shower last saturday and of course I jumped at the chance to make baby shower cupcakes! Kori is having a girl in Februrary. I couldn't be more excited! So I wanted these cupcakes to be cute and special. However, I did have come complications with some of them but in turn learned a very good lesson which I will share with you so none of you have to make the same mistake I did.

First of all, Kori has celiacs disease so I had to make some gluten free cupcakes, and for the non gluten free-I hate to say it I got so busy that I used a cake mix. But they were good! I have never really tasted anything gluten free that I have thought it could pass as non gluten free but I have to say differently about these cuppies. They were delish! Especially with the frosting which I will get to right now...

Ahh the frosting, I think I have found the best vanilla frosting recipe ever! I tweaked it a little but let me tell ya, I got so many compliments with it and because the frosting was so dang good I ended up eating five, yes five cupcakes! I know- what a horrible way to start out the new year right? The taste was so yummy it kind of out weighed the guilt. However, for the first batch I frosted the non gluten free cupcakes with I used a mixture of cream and milk instead of just milk. I noticed that the frosting began to separate as I used it and it was very difficult to pipe with and once I did pipe a cute flower it just fell apapart! So I will NEVER use cream in my frosting unless someone lets me in on a secret I do not know but for me it was so much easier to use the frosting without the cream. So here is the frosting recipe, and for all of you gluten free people I will work on getting that cupcake recipe which my mom has. If any of you think you have a better vanilla frosting recipe than this let me know! I am always looking for the best of the best!

Magnolia's Vanilla buttercream frosting

Makes enough for one 2-layer 9-inch cake or 2 dozen cupcakes*

**My additions in red

  • 1 cup (2 sticks) unsalted butter, softened

  • 6 to 8 cups confectioners’ sugar

  • 1/2 cup milk

  • 2 teaspoons vanilla extract

  • pinch of salt
  • insides of 2 vanilla beans

Place the butter in a large mixing bowl. Add 4 cups of the sugar and then the milk and vanilla and vanilla bean. On the medium speed of an electric mixer, beat until smooth and creamy, about 3-5 minutes. Add pinch of salt. Gradually add the remaining sugar, 1 cup at a time, beating well after each addition (about 2 minutes), until the icing is thick enough to be of good spreading consistency. You may not need to add all of the sugar. If desired, add a few drops of food coloring and mix thoroughly. (Use and store the icing at room temperature because icing will set if chilled.) Icing can be stored in an airtight container for up to 3 days.

These are the gluten free cupcakes, my piping looked

so much better on these because the frosting was so

much easier to work with.


Here is the frosting with the cream in it. You can see that
my piping just fell apart. I was so sad they didn't look
as cute as they could have!
More with the cream in the frosting.
The petals on these cuppies aren't defined like the ones on the
gluten free cupcakes with the frosting made with just milk.

My sis in law Kori anxiously waiting to dive into her gluten free cupcake!

And I just had to add this. This is the quilt my mom made for the
baby. Isn't it just so cute?!

Thursday, January 8, 2009


My mom has been telling me about this burger place called Five Guys Burgers and Fries. I am not much of a meat eater and I am definitely not much of a red meat eater but I just could not stop thinking about this place so my husband and I finally went. I am a one hamburger a year kind of girl at the most...but after having one of Five Guys' burgers I think that might change! It was really good and just the way I like them. It had a small hamburger patty which I can handle. It was very delicious. I also loved the fact that everything there was fresh. They had many toppings to choose from and all toppings were free! Their fries were cut daily from fresh potatoes. So instead of having a burger a year...I think I might have to have two or three:)

Look at how amazing those look! And they had the perfect amount of salt,
I hate when you have to salt your fries but these were perfect!

My hubby digging in, I know he looks like he's in pain but he is
actually in heaven!

One down two to go, if I am now allowing myself
3 burgers a year and if I want to space them out evenly
the next one wont be for another 4 months, so when
May hits I'm heading over to Five Guys Burgers and Fries!

A fun night with yum Tuscan Tomato Soup and a fun dessert

Ok-I know I haven't posted a baking post in a while which is not like me because I usually have to hold myself back from baking! I guess I actually have been sticking to my new years resolution, but don't worry I am planning a baking day tomorrow because I am just dying to try out my kitchen aid! In the mean time I have been trying to cook more. I have had a tomato soup recipe from one of my favorite restaurants (The Chef's Table) for a long time and finally got around to making it yesterday. I called my cousin-in law Tanya, also my cooking partner in crime and asked if she would be up for a cooking night and try out this tomato soup. Of course she was game and she also got the baking bug and made a fabulous dessert. So let's start with the soup:

It was so yummy...but I have bad news...as much as I hate to say this, because I absolutely HATE secret recipes, but the chef who gave this to me said not to give it out to everyone I knew. So I figured posting it on my blog would be out of the question but I do have good news! I was watching Tyler Florence on the Food Network and he made a fabulous roasted tomato soup which was very similar to the recipe I had. Pretty much the same but mine had a cup of pesto. So I'm sure if you made Tyler's recipe and added a cup of pesto it would be almost exactly the same, so please don't hate me!

I made this pesto in the summer and have had it in my freezer and after a
quick zap in the microwave it smelt just as if it were fresh! I used Giada's pesto recipe
and I have been very happy with it.

The tomato soup was so creamy and delicious. The heavy
creamy really made it feel super silky in your mouth,
I'm sure my waisteline wont appreciate that but my taste buds definitely did!

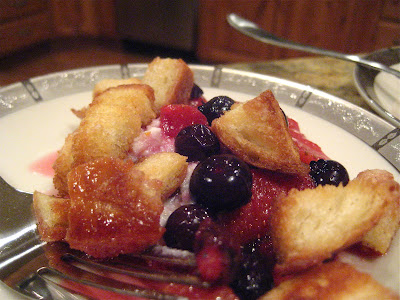
Ok on to dessert, Tanya made a berry dessert from Giada DeLaurentis and I thought it was fabulous! So refreshing and very unique. I think this is the perfect summer dessert although I had no complaints eating it in the winter. The mixture or ricotta cheese and orange zest topped with the berry mixture and vanilla sugar crutons was just an explosion of flavor in your mouth! I thought it was fabulous but Tanya had an issue with the texture of the ricotta cheese. I was fine with it but I also thought it would be good to put the ricotta cheese mixture in a food processor with a little cream to make it a sauce. So try both these recipes out and let me know what you think!

Vanill beans are definitely expensive, but I have found that the best
place to get them is Costco. For ten large vanilla beans
it was 12 dollars. Still pricy but for how big the vanilla beans
were it was a great deal.

The gorgeous berries simmering away The aroma was wonderful!

The finished product

Tylers Ultimate roasted tomato soup
Ingredients

* 2 1/2 pounds fresh tomatoes (mix of fresh heirlooms, cherry, vine and plum tomatoes)
* 6 cloves garlic, peeled
* 2 small yellow onions, sliced
* Vine cherry tomatoes for garnish, optional
* 1/2 cup extra-virgin olive oil
* Salt and freshly ground black pepper
* 1 quart chicken stock
* 2 bay leaves
* 4 tablespoons butter
* 1/2 cup chopped fresh basil leaves, optional
* 3/4 cup heavy cream, optional

Directions

Preheat oven to 450 degrees F.

Wash, core and cut the tomatoes into halves. Spread the tomatoes, garlic cloves and onions onto a baking tray. If using vine cherry tomatoes for garnish, add them as well, leaving them whole and on the vine. Drizzle with 1/2 cup of olive oil and season with salt and pepper. Roast for 20 to 30 minutes, or until caramelized.

Remove roasted tomatoes, garlic and onion from the oven and transfer to a large stock pot (set aside the roasted vine tomatoes for later). Add 3/4 of the chicken stock, bay leaves, and butter. Bring to a boil, reduce heat and simmer for 15 to 20 minutes or until liquid has reduced by a third.

Wash and dry basil leaves, if using, and add to the pot. Use an immersion blender to puree the soup until smooth. Return soup to low heat, add cream and adjust consistency with remaining chicken stock, if necessary. Season to taste with salt and freshly ground black pepper. Garnish in bowl with 3 or 4 roasted vine cherry tomatoes and a splash of heavy cream.

Basil Pesto Recipe

The following is a basil pesto recipe from Giada's Family Dinners by Giade De Laurentis

  • 2 Cups Fresh Basil
  • 1/4 Cup Toasted Pine Nuts
  • 1/2 Cup Parmesan
  • 2/3 Cup extra Virgin Olive Oil
  • 1 Garlic Clove
  • 1/2 Teaspoon Salt
  • 1/4 teaspoon black pepper

Pulse basil, pine nuts, garlic, salt and pepper. Add oil and blend to consistency. Good in the fridge for 2 days, add salt and pepper if you so choose.


Ricotta with Vanilla-Sugar Croutons and Berries
Ingredients
Croutons:

* 1/4 (4 ounces) ciabatta loaf, cut into 1-inch cubes
* 3 tablespoons unsalted butter, melted
* 1 1/2 tablespoons vanilla sugar, recipe follows

Syrup:

* 1/2 cup orange juice (from 1 medium orange)
* 1/4 cup fresh lemon juice (from 1 lemon)
* 1/2 cup sugar
* 1 cup blueberries
* 8 strawberries, hulled and quartered

Ricotta:

* 1 1/2 cups whole milk ricotta cheese
* 3 teaspoons orange zest (from 1 medium orange)
* 1 teaspoon lemon zest (from 1 lemon)
* 1 tablespoon vanilla sugar, recipe follows
* 1 tablespoon thinly sliced fresh mint leaves

For the Croutons:
Directions

Preheat the oven to 400 degrees F. In a medium bowl, toss together the bread cubes and melted butter. Add the vanilla sugar and toss until the bread cubes are coated in sugar. Arrange the bread cubes in a single layer on a parchment-lined baking sheet and bake until golden brown, about 8 to 10 minutes. Cool completely.
For the Syrup:

In a small saucepan, bring the orange juice, lemon juice, and sugar to a simmer, over medium-low heat. Stir until the sugar has dissolved, about 2 to 3 minutes. Add the blueberries and strawberries and simmer until the fruit softens, about 6 to 8 minutes. Cool the syrup to room temperature.

For the Ricotta:

Combine all the ingredients in a medium bowl. Mix well.

To serve: Divide the ricotta mixture between 4 decorative dessert bowls. Spoon the fruit syrup over the ricotta and top with the croutons. Garnish with the sliced mint.
Vanilla Sugar:

* 2 cups sugar
* 1 vanilla bean

Place the sugar in the bowl of a food processor. Using a paring knife, slice the vanilla bean in half, lengthways, and scrape out the seeds. Add the vanilla seeds to the sugar. Pulse 10 to 15 times until the vanilla and sugar are combined. Cut the empty vanilla pod into 1-inch pieces and place in a glass mason jar. Add the vanilla sugar to the jar and seal. Shake the jar before using.

Yield: 2 cups

Prep Time: 1 minute

Tuesday, January 6, 2009

A late visit from the Gingerbread man...


My friend sent me this cute cookie in the mail for Christmas! It was such a cute and creative gift and I loved the way she decorated it. It is too bad that this gingerbread man didn't last long even though it was giant! Along with the cookie she sent the recipe for it. Here it is and if you are still in the mood to make gingerbread try it out because it is a really good recipe, so good that theh title of the cookies is "The Best Gingerbread Cookies". Let me know if you try them out I would love to hear what you think!

I think it took around 10 minutes for a few of us to eat
this giant gingerbread man!

3 cups flour
1 tsp baking soda
3/4 tsp cinnamon
3/4 tsp ginger
1/2 tsp allspice
1/2 tsp cloves
1/2 tsp salt
1/4 tsp fershly milled black pepper
1 stick unsalted butter, at room temperature
1/4 cup vegetable shortening
1/2 cup light brown sugar
2/3 cup unsulfured molasses
1 large egg

Position the racks in the top and bottom thirds of the oven adn preheat to 350 degrees F.
Sift the flour, baking soda, cinnamon, ginger, allsice, cloves, salt and pepper thtough a wire sieve into a medium bowl. Set aside.

In a large bowl, using a hand held electric mixer at high speed, beat the butter and shorteing until well combined, about 1 minute. Add the brown sugar and beat until the mixture is light and texture and color, about 2 minutes. Beat the molasses and egg. Using a woodend spoon, gradually mix in the flour mixture to make a stiff dough. Divide the dough into two thick disks and wrap each disk in plastic wrap. Refrigerate until chilled, about 3 hours.

To roll out cookies, work one disk at a time, keeping the other disk refrigerated. Remove the dough from the refrigerator and let stand at room temperature until just warm enough to roll out without cracking, about 10 minutes. Place the dough on a lightly floured work surface and sprinkle the top of the dough with flour. Roll out the dough 1/8 inch thick, being sure that the dough isn't sticking to the work surface. For soften cookies, roll out slightly thicker. Using cookie cutters, cut out the cookies and transfer to nonstick cookie sheets, placing the cookies 1 inch apart. Gently knead the scraps together and form into another disk. Wrap and chill for 5 minutes before rolling out again to cut out more cookies.
Bake, switching the positions of the cookies from top to bottom and back to front halfway through baking, until the edges of the cookiest are set and crisp, 10-12 minutes. Cool on sheets for 2 minutes, then transfer to wire cake racks to cool completely. Decorate with royal icing.

Thursday, January 1, 2009

Hope everyone had a wonderful Christmas and a Happy New Year!

I hope everyone had a wonderful Christmas and a Happy New Year and I need to apologize for being so absent! Christmas was super busy and I have come down with a cold that I just can not kick so I haven't been able to be on top of my posts. But I just wanted to share with you my exciting new Christmas gifts! One imp articular...it is officially crossed off my wish list...my mom got me the Pink Kitchen Aide! I am so excited about it. I haven't been well enough to bake yet but I am so excited to use it I can hardly stand it! I also got a lot of fun kitchen gadgets from my mother in law which included a variety of salts. I got fleur de sel, black truffle salt and lime salt. I can't wait to use all of them. Take a look for yourself and I will post as soon as I make something from my kitchen aide! And I promise to be more diligent with my posting once I get my health back.

There she is. Isn't she beautiful? I am already thinking
of the many wonderful times we will have together,
all of the wonderful batches of swiss meringue buttercream, cookies, and cupcakes
we will go though...I just can't wait!


Here all the the cooking goodies and gadgets I got. I was really excited
about this rubber whisk that I got because I can use it in my nonstick
pans and it wont scratch the pans!
Isn't it easy to satisfy a baker/cook for Christmas?
I got these napkins in my stocking. I think they are the cutest ever!

I was so excited about this assortment of salt. From left to right:
black truffle salt, fleur de sel, lime fresco salt. I think I can use the
lime salt in so many things next summer and I have wanted fleur de sel for a long time.
If anyone has any ideas on how I could use the black truffle salt I would love to hear them!