Monday, August 29, 2011

Black Bean Tacos


Can we just pretend that the picture above is a beautiful, nicely arranged plate of tacos? Can we just pretend that I didn't take a picture of them in two seconds right before I scarfed them? Because let's face it, sometimes by the time I make dinner I don't have the will power to wait on eating my plate of food before I can arrange it for a photo. This was one of those times-but now that all of our imaginations are in gear, let's talk about these super yummy black bean tacos!

I am always looking for ways to make vegetarian versions of things (by the way, if any of you have good vegetarian main dish ideas please pass them my way!) I am not a vegetarian by any means, but I do try to cook with meat only once a week, sometimes less. I've seen tacos made with TVP, but never thought that sounded very good (but I could be wrong!) So I decided to replace the meat called for tacos with black beans. I get the big spice jar of taco seasoning from costco and just followed the directions but replace the black beans for the meat. I didn't know how these would turn out, I guessed that they would be decent, but I never would have guessed that they would be amaaazing! They were seriously so good that I am excited to say I have my vegetarian version for tacos that I think I will stick to forever. They are better for you, cheaper, and just as good if you ask me. Little Eleni loved the beans, which is always nice:) I will post the recipe that I kinda made up, but it really is a "add a little bit of that, maybe a little more of that " recipe:)

Black Bean Tacos
makes 4-6 tacos

1 can black beans
1/2 cup water
2-4 tablespoons taco seasoning (I did 2ish because I didn't want it too spicy for Eleni, but if I didn't have to worry about that I would have done more)

*simmer black beans, water, and seasoning about ten minutes. Then it's ready to stuff into your taco shells! Top with your toppings and give it a fresh squeeze of lime:)

Toppings (of course you could do whatever you liked, but this is what I did)
lettuce
avocado
red onion
queso fresco (i used feta but queso fresco would be better)
thinly sliced red onion
fresh cilantro
lime

Tuesday, August 23, 2011

A Peanut Butter Pie For Mikey


This peanut butter pie is to honor Jennifer Perillo's husband Mikey, who recently passed away. You can read what she said on her post here. I just stumbled upon Jennie's blog through Bakerella. I saw so many within the blogging community making peanut butter pie's for Mikey, because that was his favorite. Jennifer on her blog said so many people were asking what they could do and she told them to make a peanut butter pie for someone they loved, and hug them like there's no tomorrow because today is the only guarantee we can count on. So one peanut butter pie for Mikey, and a big hug to my Micah. I can't imagine what Jennifer is going through, it breaks my heart to know that in this life she wont be able to hug her sweet husband and her little girls wont be able to see their dad. But I have faith and believe that they will be together as a family one day.

Big Hugs and Kisses to all of my family and friends, especially my family in Utah who I love so much!

Creamy Peanut Butter Pie

Serves 10 to 12

8 ounces chocolate cookies

4 tablespoons butter, melted

4 ounces finely chopped chocolate or semi-sweet chocolate chips

1/4 cup chopped peanuts

1 cup heavy cream

8 ounces cream cheese

1 cup creamy-style peanut butter

1 cup confectioner's sugar

1 – 14 ounce can sweetened condensed milk

1 teaspoon vanilla extract

1 teaspoon freshly squeezed lemon juice

Add the cookies to the bowl of a food processor and pulse into fine crumbs. Combine melted butter and cookie crumbs in a small bowl, and stir with a fork to mix well. Press mixture into the bottom and 1-inch up the sides of a 9-inch springform pan.

Melt the chocolate in a double boiler or in the microwave. Pour over bottom of cookie crust and spread to the edges using an off-set spatula. Sprinkle chopped peanuts over the melted chocolate. Place pan in the refrigerator while you prepare the filling.

Pour the heavy cream into a bowl and beat using a stand mixer or hand mixer until stiff peaks form. Transfer to a small bowl and store in refrigerator until ready to use. Place the cream cheese and peanut butter in a deep bowl. Beat on medium speed until light and fluffy. Reduce speed to low and gradually beat in the confectioner's sugar. Add the sweetened condensed milk, vanilla extract and lemon juice. Increase speed to medium and beat until all the ingredients are combined and filling is smooth.

Stir in 1/3 of the whipped cream into the filling mixture (helps lighten the batter, making it easier to fold in the remaining whipped cream). Fold in the remaining whipped cream. Pour the filling into the prepared springform pan. Drizzle the melted chocolate on top, if using, and refrigerate for three hours or overnight before serving.

Thursday, August 18, 2011

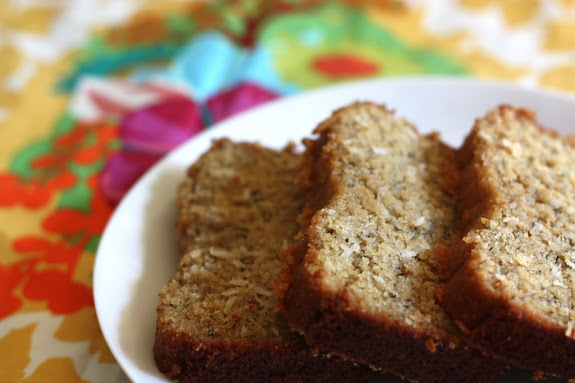
Coconut Banana Bread with Lime Glaze


I have a confession. I hate bananas. I just can't get around their mushy texture. I've tried to like them-I really have, but to no avail. However, I LOVE banana bread. This sometimes presents a problem for me. For example, why don't we take a look at the last few weeks. I bought a bunch of bananas and waited for them to get nice and ripe so I could make banana bread. The day finally arrived when they reached their perfect "ripeness", so I decided to make this coconut banana bread recipe I've wanted to try. Well, I started mashing a banana and couldn't do it anymore. It literally made me sick! I'm not kidding-I know I am sounding like a five year old but dry heaves were in the air people! I don't know why their mushy texture makes me so sick....anywho....

I decided to give it another try. Bought more bananas, waited till they were ripe, and gave it another go. Even though I got a little gaggy mashing the bananas I pressed on! And boy am I glad I did! This banana bread rocks! It's so delicious and of course I have a love affair with coconut so the coconut made it that much more delicious. It was my first time using kamut and I loved it. No one would ever have guessed it was made with anything but white flour. I can't wait to use kamut a lot more. Why use kamut? A few fun facts about it is that it has less gluten than wheat and more protein. I hope you have a chance to make this delicious bread, I know you will be more mature about it than me and not get grossed out by your bananas...

A couple things I did differently: I used coconut milk instead of buttermilk, I used half butter and half coconut oil because I was almost out of coconut oil, and I omitted the lime glaze because I didn't have limes.

Coconut Banana Bread with Lime Glaze
from Unconventional Kitchen

2 C flour, I used kamut, but whole wheat would work as well
3/4 tsp baking soda
1/2 tsp salt
1 C sucanat** (or raw sugar if you don’t have sucanat yet)
1/4 C coconut oil, softened
2 large eggs
1 1/2 C mashed ripe bananas (about 3 large bananas)
1/4 C plain yogurt
3 Tbs buttermilk (or any type of milk, almond, rice dream etc.)
1 tsp vanilla extract
1/2 C coconut, unsweetened

Topping: 2 Tbs additional coconut
Glaze: 1/3 C agave with 2 T lime juice

1.Preheat oven to 350 degrees.
2. In a mixing bowl cream together coconut oil and sucanat.
3. Add in eggs, yogurt, vanilla, and apple juice (or milk) beat until smooth.
4. In a separate mixing bowl, add flour, baking soda, salt, and coconut, mix until smooth.
5. Mix together the dry ingredients to the wet ingredients, do not overmix.
6. Fold in the mashed bananas.
7. Pour into a greased 9×5 loaf pan and sprinkle with remaining coconut.
8. Bake at 350 for 55 minutes (if coconut starts getting too brown, cover with tinfoil the last 15 minutes of baking).
9. While bread is baking whisk together agave and lime juice.
10. Drizzle over the hot bread and go ahead and eat a piece right out of the hot pan, you deserve it!
11. Then let it cool 15 minutes and slice it.


Tuesday, August 16, 2011

Quinoa and Peas side dish


I love Quinoa. We eat it all the time. My little one eats it just about every day. I am always looking for new ways to jazz it up and serve it as a side. The other night I thought was a definite take out night. I felt like I had zero food options at home. However, I decided to be creative and save money and just try to make something with what I had. So, I created a quinoa and pea dish with red onions. I then served it with a side of broccoli. Ok-not the most exciting dinner, but I didn't' spend any money on take out and I felt so proud of myself! I would normally serve this quinoa dish as a side but it also made a great main dish with another side of vegies. It's quick, easy, yummy, and healthy. Those four words usually don't go together so I would say my creation was a winner:) I will do the best I can to re-write the recipe. But it's not an exact recipe so just use as much onions or peas as you want. Enjoy!

Quinoa and Peas

1 cup quinoa
2 cups chicken stock, vegetable stock, or water
1/4 - 1/2 cup of red onion, diced
About a cup of cooked peas (more or less if you want)
salt and pepper to taste
olive oil

Place quinoa and liquid in pot. Bring to a boil. Cover, and let simmer for fifteen minutes. Meanwhile, cook onion over medium heat in a little bit of butter. Cook until onions are translucent. When quinoa is cooked, add onions and peas. Season with salt and pepper and serve with a drizzle of olive oil.

Monday, August 1, 2011

Healthified Scotcharoos


Is it just me, or is it the best thing ever when you find a "healthified" version of a desert and it's even better than before?! I honestly get so excited when I make better for you treats and they are delish! This desert is one of my favorites I have made in that regard. I got the recipe from unconventional kitchen-I think Desiree is a genius in the kitchen. These have no high fructose corn syrup, just honey and brown rice syrup to sweeten them. I made them for a little dinner I hosted last night with some friends and everyone was raving, I even got a comment that they were better than original scotcharoos! The only problem with them is I started picking at them for breakfast, and one little bite led to another and before I knew it I was down to one last piece! So I quickly snapped a picture of the last piece so I could post this wonderful recipe. Can't wait to make these for my kiddies and put them in their lunches for school! :)

Scotcharoos Made Healthy-ish
from the Unconventional Kitchen

1 1/2 C peanut butter – I use Costco organic brand, or Adams without added sugar and oils
1 C honey
3/4 C brown rice syrup (you can get this at the health store)
6-8 C crisp brown rice cereal (you can get this at the health food store, or substitute your favorite healthy cereal)
2 C dark chocolate chopped or dark chocolate chips

1. Melt peanut butter, honey,and brown rice syrup over low heat.
2. Once all of the mixture is all melted and mixed together well add the cereal.
3. Mix all of it together and press it into a 9×13 pan.
4. While the rice krispie part is cooling, melt the chocolate chips over low heat. I just use the same pan for this part, I hate doing dishes.
5. Spread the chocolate chip mixture over the rice krispie base, put in the fridge to let cool and soften.
6. Try not to eat the whole pan!